
Texas Instrument's SN754410 is know to be a half-bridge driver suitable for low power applications it's rated current is 1A per channel. Costing only $1.55 it's a great choice for small robots on a budget.
Now what do you do if you need more power ? Multiply! Bruteforce ! Without much talk below is the schematic:
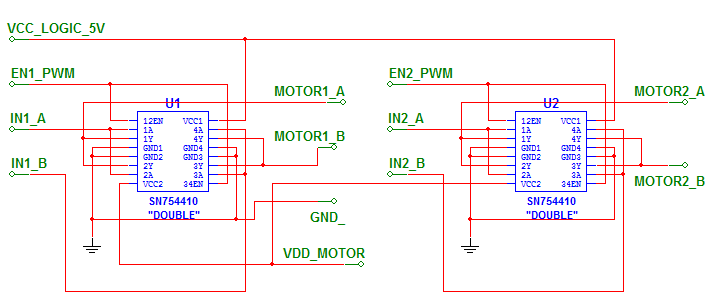
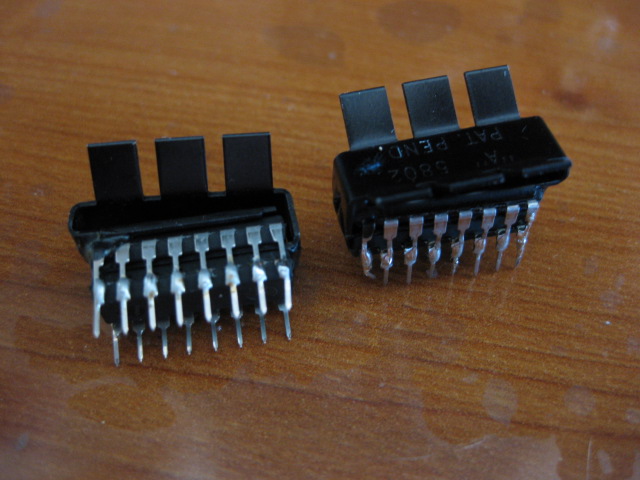
This schematic is easier to explain in words , than to follow. First note that "DOUBLE" near SN754410, this means that each chip is doubled by soldering another chip on top of it, I also added a heatsink:
Each SN754410 chip has 4 input channels: 1A..4A , and four corresponding output channels 1Y..4Y. We combine channels 1 & 2 and then 3 & 4. Thus each of our driver's input will use 4 channels (2 from each chip each capable of 1A).
As far as enable inputs we combine 12EN & 34EN for each chip. This is where we'll send our PWM signal.
If confused have a look at SN754410 Datasheet. I promise it's not that complicated ! According to page 2 of the datasheet SN754410 already has clamping diodes that should protect the chip from back EMF.
I built my driver on a perforated board using hook-up wires. With so many inputs and outputs it's easy to get confused so everything was labeled using my label maker. Have a look at the result:
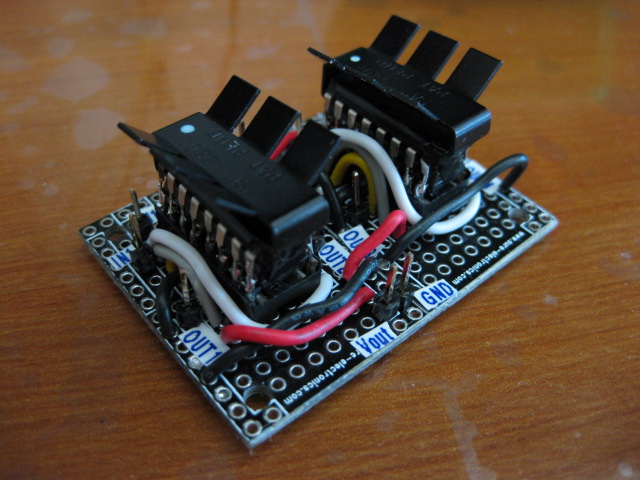
Before running 4amps through the driver it's a good idea to test it:

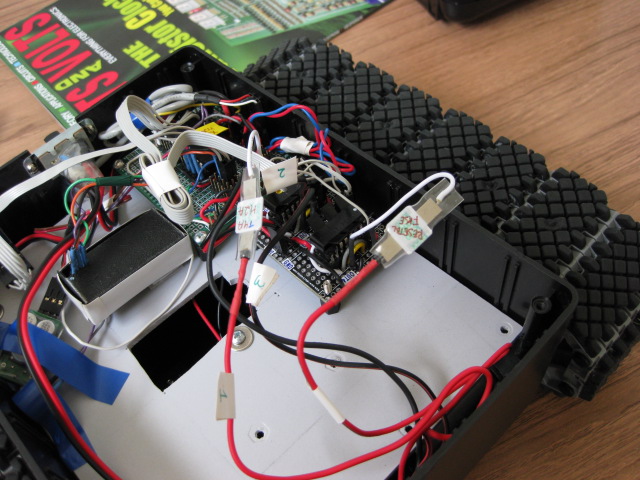
All looks good, now let's drive that robot already! My tracked robot has 2 gearmotor with a stall current of about 3.7 amp. Octodriver should handle up to 4A per motor. But I also used 2 resettable fuses with hold current of 2A , that would trip at 4A. Better safe than sorry :)
Here is the OctoDriver in it's mom's belly:
Finally I am including a video of the controller working in a robot. I have to mention that this is a 4 pound bot that will get heavier. Let's have a look how it goes through obstacles:
//starlino//
If you have questions about what kind of motor to choose for your DIY project here is a summary presentation of different types of motors. You will see here how they work and in what kind of projects you can use them wisely: http://www.microdiy.com/index.php?/tutorials/motor-tutorial-for-diy-electronics-project.html
Awesome motor driver. I seen the Gadgetgangsta version on Instructables which led me to your site.
Im going to be buying the parts for this build tomorrow for my new robot build.
have you got any more info on your tracked bot? Would like to see/know what type of motors and track setup your using, looks great
Thanks
John
This bot uses Lynxmotion tracks:
http://www.lynxmotion.com/Product.aspx?productID=511&CategoryID=94
and GHM-13 Lynxmotion motors:
http://www.lynxmotion.com/Product.aspx?productID=250&CategoryID=11
The brain is a PIC, and there are 2 radio modules one is taken from a RC toy for manual control and another one is a wireless USART similar to this:
http://www.sureelectronics.net/goods.php?id=1053
molto tecnico e anche divertente,,
Fantastic! What a great idea.
Where did you get those heatsinks?
Pingback: Doubling down on motor drivers - Hack a Day
Pingback: Indagadores |Seguridad informatica |Seguridad en internet » Doblar los conductores del motor
Pingback: Belgaum news | About Belgaum | Belgaum information | Belgaum district | Belgaum city | Belgaum Hotels | Belgaum People | Belgaum tourism | Belgaum entertainment | Belgaum students | Inside facebook | Hack | make use of | technical news | | Doubling down o
Pingback: Doubling down on motor drivers « My Horizon Wireless
Pingback: Doubling down on motor drivers | Orange Claymore Red Slime