Introduction & Demo of the QuadHybrid Design
I’ve been experimenting for quite a while with different configurations of Multi-Copters and RC Helicopters, basically looking for a stable robotic platform that can be used for my machine vision or other sensor-enabled flying robotic projects. RC helicopters have been around for quite a while, however (with the exception of some 3-Channel helicopters) they are not easy to fly, not very stable and not too precise in maneuverability – in other words not exactly good match for a flying robot. Then came the quadcopters and everyone loved them, talked about them , and eventually wanted to or actually built one. I built a few – and what I learned is that they have a great lifting power, great maneuverability (basically equivalent to a 4ch or 6ch heli), however they rely entirely and heavily on relatively expensive IMU sensors to achieve this stability. I a QuadCopter you basically have four “monster” motors on each beam than must be synchronized precisely. Because you’re controlling so much power with your IMU sensors – any small deviation or lack of callibration and your platform is no longer stable. That’s why the sensors are crucial in a quadcopter – without them the quadcopter will not fly at all !
After many trial designs – my conclusion was that a suitable flying robotic platform must not rely too much (or at all) on its sensors to be stable while hovering. It must be mechanically symmetric, preferably with it’s center of mass in the center. At the same time it must have the maneuverability capabilities of a quadcopter – and namely I wanted it to fly sideways, forward & back and rotate around its axis. Although the solution I came up with might seem to some (including myself) a little strange and out of the ordinary – as turned out it flew surprisingly well , was very stable and maneuverable, and best of all – had a very low price tag due to the fact that it was easy to built from the off-the-shelf toy helicopter replacement parts.
Without further adieu – below is the picture of the machine that I called “QuadHybrid”:
My very first QuadHybrid prototype.
Below you can see some flying test video:
So What Exactly is a QuadHybrid ?
Let’s have a closer look at QuadHybrid’s pictures. A simple way to look at it is: a co-axial helicopter on top of a quadcopter – it’s actually as simple as that.
In total QuadHybrid has 6 motors and 6 propellers (2 large one center from the helicopter + 4 small on each arm from the quadcopter).
The two large center propellers in the center consist of 2 heli-type blades – they provide all the lifting power needed. They spin in opposite directions to compensate for the yaw rotation introduced by any rotating propeller and are stabilized by an optional vertically mounted MEMS gyroscope (the only sensor used in this design). The slight difference in speed of the top and bottom blades is used to control the desired yaw rotation. Thus the center motors provide the throttle and yaw control of the QuadHybrid – in other words ability to fly up/down or rotate about its center vertical axis.
The four small rotors on the four arms are actually small tail motors from a 3ch helicopter, they provide the remaining maneuverability functions – pitch/roll or – or in other words the ability to fly forward & backwards or shift sideways (right / left) .
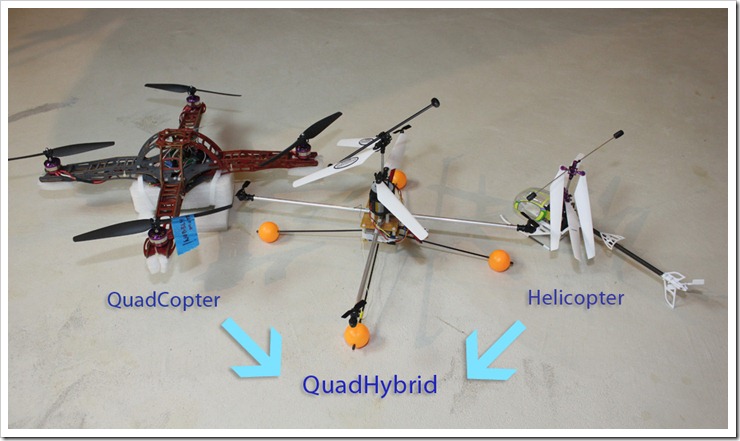
The resemblance to a quadcopter and a helicopter can be seen in the picture below where they are put side by side.
How Does a QuadHybrid Work and How to Build One
QuadHybrid has all the maneuverability of a 4 channel helicopter or a quadcopter (throttle, yaw, pitch and roll). A 3 channel helicopter as we know it – only has 3 controls (throttle, yaw and pitch). The problem with a co-axial 4CH helicopter for instance is that it relies on a swash plate and servos to achieve the pitch/roll control. Basically it is a servo mechanism for tilting the axis of rotation of the bottom rotor – it is not easy to fine tune and it needs frequent maintenance. A 3CH toy helicopters on the other hand relies on a tail rotor to achieve the pitch control – and this is one of the ideas I used for QuadHybrid – basically I multiplied the tail boom and rotor on a 3CH helicopter by four.
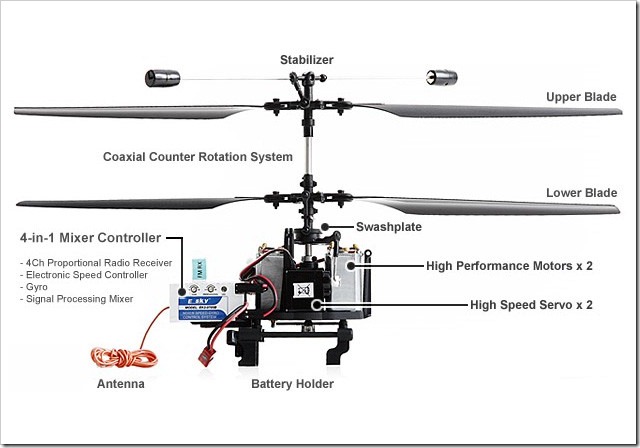
This is how a typical 4CH helicopter is build. Please note that the bottom blade can be tilted by using 2 servos that tilt the swashplate. In the QuadHybrid design we are going to eliminate the servos and the swashplate and replace them with 4 small motors mounted on 4 arms (beams), just like on a quadcopter.
I built my QuadHybrid, from spare RC or “toy” heli parts. They are widely available and thanks to the fact that manufactures copy each other in some cases bluntly, these parts are compatible in many cases so I was able to mix-and-match. I took the electronics from a E-Sky Lama V3 helicopter – that is a 4 channel heli so it has a swashplate and 2 servos to control the pitch and roll. Because I didn’t wanted the swashplate (the roll/pitch on QuadHybrid is controlled by the 4 small quadcopter style rotors), I used the frame and blades from another toy helicompter – Syma S001 and I was able to fit the Esky motors into that frame which are bigger and more powerful than the S001 stock motors.
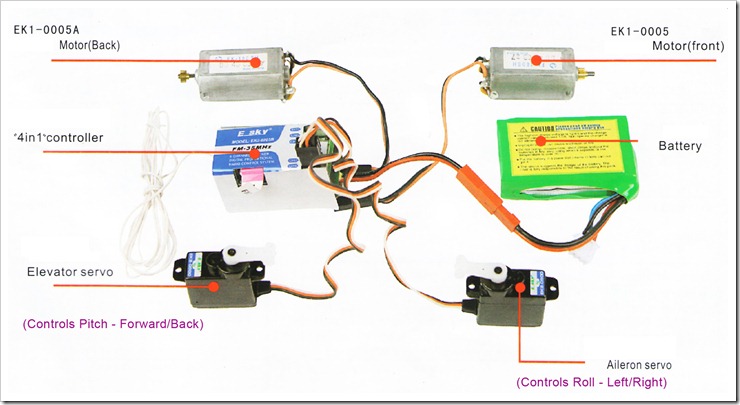
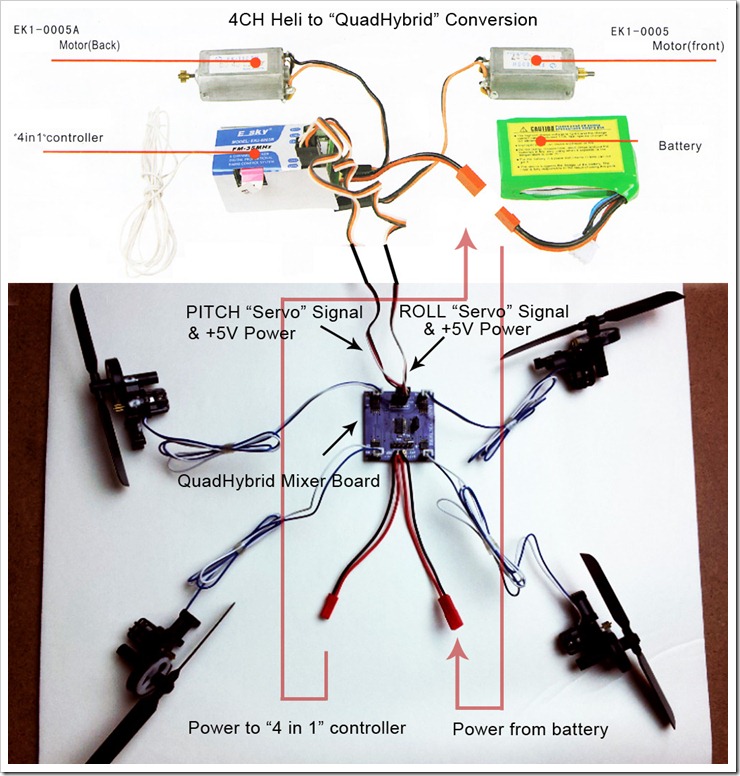
To clarify the design let’s look at the guts of the E-Sky Lama V3 helicopter . I actually used all electronics in this 4CH helicopter, except the servos (as will become clearer in the next diagram):
The main idea of the QuadHybrid design is: to achieve a better Pitch/Roll control I replaced the servos with a custom control board called “QuadHybrid Controller V1”. This board basically takes the servo RC signals (Pitch and Yaw) as inputs and controls the 4 arm motors using a set of 4 transistors. This allows QuadHybrid to fly just like a quadcopter in “+” or “X” configurations (for explanation of “+” or “X” flying configurations see for example http://technicaladventure.blogspot.com/2012/09/quadcopter-stabilization-control-system.html).
On the mechanical part – the swashplate on the bottom blade was replaced with a fixed blade mount from a 3CH helicopter. This made the bottom blade of the 4CH fixed. Normally on a 4CH heli it is being tilted by servos that are connected to the swashplate using 2 links.

This is a swashplate assembly on a 4Ch helicopter it is the black disk under the blades mount. It is connected to the blade mount with two links. Two servos that are controlled by the RC receiver are able to tilt the swashplate and thus alter the axis of rotation of the bottom blade. This is how the roll and pitch is controlled in a 4 channel helicopter. It is far from perfect and requires frequent tune-ups.
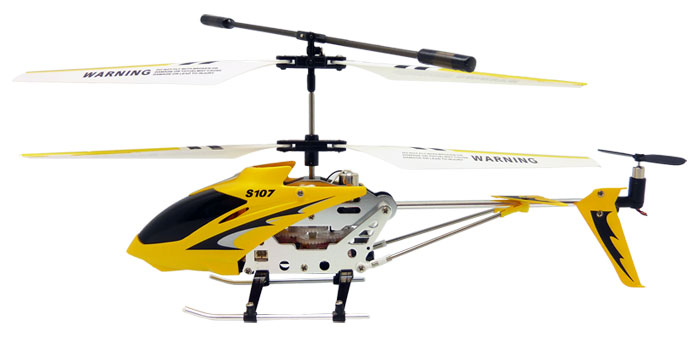
A gyro-stabilized co-axial 3 channel toy helicopter is fairly stable, as opposed to a 4CH helicopter- it uses the tail rotor to control the pitch (flying forward or backward). Note the bottom blade is fixed , just like on the QuadHybrid.
QuadHybrid Controller Board and Software
Below is the schematic of the QuadHybrid V1 controller (the blue board on the diagram above that controls the 4 motors). This is the only custom component that is not available from RC toys parts.
At the heart of the QuadHybrid V1 controller board is a PIC16F1825 microcontroller – it’s main task is to capture the servo signals received on ports RA5(ROLL) and RA4(PITCH) and convert them to 4 PWM signals that control the 4 rotors mounted on arms. The motors are driven using 4 NPN transistors – these can be any NPN transistors as long as they have a current rating of at least 1A (or the maximum current of your arm-mounted motors) and a low Collector-Emitter resistance (< 0.3Ohm or so). MOSFET could be used instead of NPN transistors, with slight schematic change – however I found hard to source them in an easy to solder and light-weight TO-92 package so I used NPNs instead.
QuadHybrid V1 controller board operates by default in “+” configuration. If you want to operate it in “X” configuration then connect the X_CONF jumper – this will give you better control with smaller motors , since for example flying forward will activate two motors at once (3 & 2). The only thing to keep in mind when flying in “X” configuration is that the “Front” is a imaginary line between arm #0 and #1 .
QuadHybrid V1 PCB was created as a all through-hole design so that anyone can assemble it and covert a toy RC helicopter into a QuadHybrid:

For anyone wishing to spend time on creating their own QuadHybrid V1 controller board – source code and Eagle files are available on the SVN repository, otherwise easy to solder kits will be available in my Store.
If you would like just to peak over the source code here is a direct link:
https://code.google.com/p/quadhybrid-v1/source/browse/trunk/%20quadhybrid-v1/src/main.c
As you can see it is a fairly simple project a(for anyone familiar with C and microcontrollers) and a good placeholder for further improvements and add-ons.
Mechanical Construction
On top of QuadHybrid prototype is basically a stripped down frame of a 3ch helicopter and namely it comes from Syma S001:
Under the frame are 2 aluminum tubing pieces that form the 4 arms. At the end of each arm I attached a tail rotor from the same Syma S001 helicopter model:
Then, to house all the electronics and battery I just sandwiched two perforated boards with nylon spacers (Tip: most bolts,nuts and spacers used in this design are nylon-made to lower the weight) :
For landing gear I just used a RC helicopter training kit that consist of a round bracket attached to the bottom deck, four carbon fiber rods and four (orange) ping-pong balls:
Please note that: although all the mechanical parts are from a 3Channel helicopter (Syma S001), you will need electronics from a 4Ch helicopter! The main reason for using a 3CH helicopter for mechanical part is because the bottom blade bracket was already fixed (3Ch helicopters have no swashplate):
It might be more economical to get a 4Ch helicopter (mainly for its electronics that support pitch & roll not just pitch as a 3Ch helicopter) and then just remove the servos and the swashplate and then fix the bottom blade bracket using screws and/or glue. As I did in the photo below (E-Sky Big Lama parts shown):
As an alternative to fixing the bottom blade bracket, you can also get a fixed blade bracket from a 3CH helicopter – it must be same inner diameter as the one from your 4CH helicopter. The diameter of the outer drive shafts are typically 4mm ( and 5mm , 6mm and even 8mm for larger helicopters).
Esky helicopters are best to use in terms of electronics because they have standard signal RC protocols in their transmitter / receiver boards that you can tap-into to get the Pitch/Roll signals needed for the QuadHybrid controller board. Syma helicopters integrated boards are harder to hack into – however some people have managed to hack into them and reverse engineer the signals.
Conclusion: What are The Advantages and Disadvantages of the QuadHybrid Design over a traditional QuadCopter or a RC Helicopter
While building the QuadHybrid I selected the best features of a quadcopter and a helicopter and put them together, this resulted in a machine that took the best of the two worlds:
– QuadHybrid is mechanically symmetrical and stable. As opposed to a QuadCopter it does not rely on sensor to achieve this, the main hovering stability comes from the co-axial design and the centrifugal momentum of the fly-bar (the black bar on top of the blades with two weights on each side) – this is basically the same principle at work as in a mechanical gyroscope.
– QuadHybrid only requires two lifting “powerful” motors, the other 4 small motors are used for steering and are not crucial for device stability. There’s no need for motors to be brushless, and no need for brushless ESC controllers, they can be cheap RC-type brushed motors that can be driven by MOSFETs or transistors, there’s no need to reverse rotation of any motors, however it will be a feature in V2 of the controller board. Also there’s no need for CW and CCW propellers for the motors mounted on arms. All this vastly reduces the complexity and cost of the design.
– Partial or complete failure of any motor will still keep device in the air and give the operator/program a good chance to land it safely. In the worst case scenario – if a driving motor fails , the device will loose lifting power and will spin in the air, but will still at least stay on it’s vertical axis. In case of a quadcopter – failure of any motor is fatal – it will basically flip the quadcopter, or make it fly sideways with great chance to hit something. This is of course debatable, but in any case statistics tells us that the probability of one of the 4 motors to fail is twice of that of one of the two motors to fail (and economics tells us it’s also cheaper to get two motors than four). Failure of any arm-mounted motor on a QuadHybrid is not critical, the device will still hover in the air and can be landed safely.
– Safety (we all know it should be first). A QuadCopter without shielded high-powered rotors is a pretty dangerous device, its propellers are spinning with an incredible force and are ready to cut into anything that falls in their way – they can do a lot of damage to humans, pets or property. QuadHybrid only has four low-powered motors on its arms since they are only used for steering, not lifting. The center driving propellers on a QuadHybrid are shielded away by its arms, also they have a folding design, so if they hit something it will somewhat make the impact less destructive. Overall QuadHybrid is more suitable for indoor applications such as schools , universities or research facilities. Make no mistake though – QuadHybrid can still do damage and safety procedures must he observed at all times !
Few advantages of Quadcopters over QuadHybrid worth mentioning may be:
– because they have four powerful motors, Quadcopters have greater lifting power. However this is more of a “brute-force” advantage – one could always get more powerful motors and battery for a QuadHybrid to achieve the desired lift power.
– Quadcopters can do some serious aerobatics (if you’re a good pilot) including fly upside down or do 3D stunts. This is not really an advantage for some people, specifically when you are actually trying to build a nice and stable robotic platform – on the contrary it’s more something you try to avoid.
In conclusion: although this first version of QuadHybrid was not designed to do 3D stunts or fly with high speeds – it has a great hovering and maneuvering stability. I think it will find most of its use as a highly stable and controllable indoor flying robotic platform. However similar spin-offs could be expected to be developed for flying outdoors and/or with higher speeds.
//starlino//
This article is dedicated to all my math and science teachers !




Pingback: Turning four smaller helicopters into one larger quadcopter
Pingback: – Turning four smaller helicopters into one larger quadcopter
Have you seen any improvements (or lack of) in power consumption?
Morgan: no major changes in power consumption. I removed some parts from the heli, but then I added some more so the weight stayed almost the same. Power depends on battery capacity used. I used a 700mAH 7.4V LiPo and that would give me around 5 min flight time on a full charge.
i liked the design for this quadhybrid..and i want to build it at home…but this is my first time doing so as i am an ametuer…i didnot understand the part about the “QUADHYBRID V1 controller board” and i do not know how to build it at home…please reply soon..
How do you think stability in wind or outdoor conditions would be compared to a traditional quad. It seems you do not have a large amount of thrust available for position hold in this current design. Perhaps using a traditional quad controler setup for pitch/roll/yaw and your setup for lift might be the secret?
this is very nice i am impresed of this design.
That’s a real shame,I’d love build one of these I’ve got loads of old helis lying about apart from the pcb board and I’ve no idea about building one,
Would it be possible to modify the QuadHybrid V1 controller board to control the 2 main motors as well? That way a standard controller/receiver system could be used with more powerful batteries/motors.
Nate: yes it is possible to control main 2 motors. However I wanted to re-use as much of existing off-the-shelf electronics. To control the main motors you will need to basically add 2 MOSFET N-CH drivers and a Z-axis gyro.
Dear Starlino,
I greatly admire your design, this QuadHybrid (Hybri-Quad?) looks like it significantly reduces the costs involved in a quadcopter. Would your design be achievable with a £250 budget?
Also would it be possible to create one of these with an Arduino autopilot that has an altitude and GPS sensor (and maybe even more) connected so that it can fly autonomously by following a program?
Kind regards,
FlyPhi
FlyPhi: The great cost saving arises from having fewer lift motors. Currently more and more control boards support this configuration, for example the KK2 / KK2.1 boards support the Dual Copter / Single Copter configurations that is similar to my design (except they use servos for steering). I am confident this can be built under £250 with cost going down on all components …
I am from India and we are interested in making this project but the only concern is that we want to make it big. so can you plz suggest the kind of motors we can use for the centre and also for the four arms
And also it would be great if you give some advice to make it as stable as possible.